Adjustable components (seats, mirrors, steering wheel)
Front seats
Manual seat
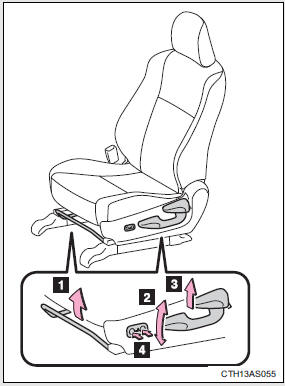
1. Seat position adjustment lever 2. Vertical height adjustment lever (driver’s side only) 3. Seatback angle adjustment lever 4. Lumber support adjustment switch (driver’s side only)
Power seat
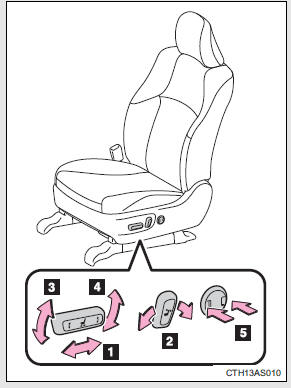
1. Seat position adjustment switch 2. Seatback angle adjustment switch 3.Seat cushion (front) angle adjustment switch (driver’s side only) 4. Vertical height adjustment switch (driver’s side only) 5. Lumber support adjustment switch (driver’s side only)
Active head restraints
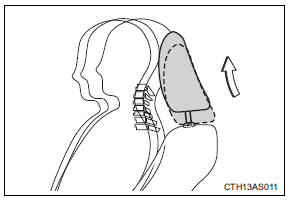
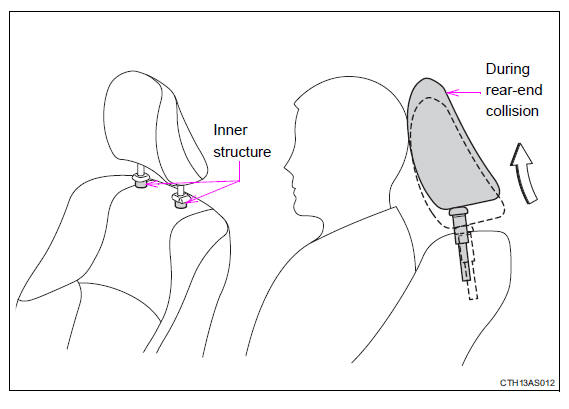
When the occupant’s lower back presses against the seatback during a rear-end collision, the head restraint moves slightly forward and upward to help reduce the risk of whiplash to the seat occupant.
The auto away function for exiting the driver seat
If the seat is already close to the rearmost position, the auto away function may not operate when the driver exits the vehicle.
Active head restraints
Even small forces applied to the seatback may cause the head restraint to move. Pushing up a locked head restraint forcibly may appear the head restraint inner structure. These do not indicate problems.
CAUTION
Seat adjustment
• To reduce the risk of sliding under the lap belt during a collision, do not recline the seat more than necessary.
If the seat is too reclined, the lap belt may slide past the hips and apply restraint forces directly to the abdomen, or your neck may contact the shoulder belt, increasing the risk of death or serious injury in the event of an accident.
Adjustments should not be made while driving as the seat may unexpectedly move and cause the driver to lose control of the vehicle.
• After adjusting the seat, make sure that the seat is locked in position.
Rear seats
Vehicles without third row seats
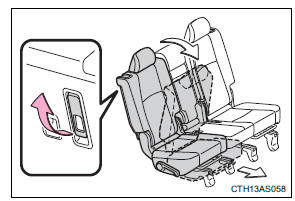
Rear seat
Pull up the seatback angle adjustment lever until the lock is released.
Vehicles with third row seats
Second row seats
1. Seat position adjustment lever 2. Seatback angle adjustment lever
Third row seats
The third row seats do not have a seat adjustment function.
Folding down the rear seats (vehicles without third row seats)
Before folding down the rear seats
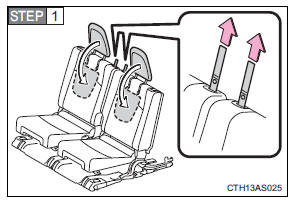
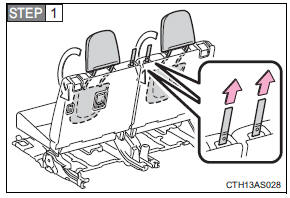
Adjust the head restraints to the downmost position.
Fold down the head restraints.
When returning the head restraints to their original positions, make sure they are locked securely.
Stow the rear seat belt buckles.
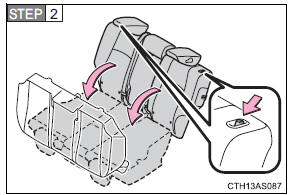
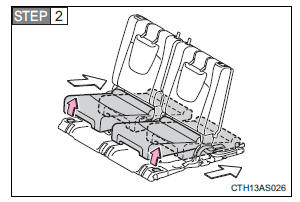
Folding down the rear seats
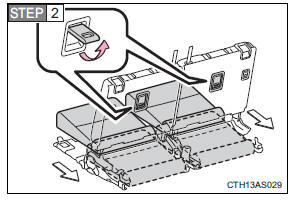
Swing the bottom cushions up by pulling the lock release strap.
When returning the rear seat cushions to their original positions, make sure they are locked securely.
Push the lock release button and fold down the seatbacks.
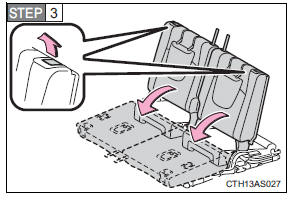
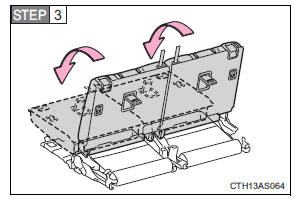
To return the rear seatbacks to their original positions, lift them up until they lock.
Folding down rear center seatback only
Pull the center seatback angle lever behind the seatback and fold the seatback down.
To return the rear center seatback to its original position, lift it up until it locks.
Folding down the second row seats (vehicles with third row seats)
Before folding down the second row seats

Adjust the head restraints to the downmost position.
Stow the second row seat belt buckles.
Folding down the second row seats
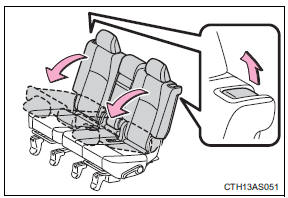
Pull the seatback lock release lever and fold the seatback down.
To return the second row seatbacks to their original positions, lift them up until they lock.
Folding down the second row center seatback only
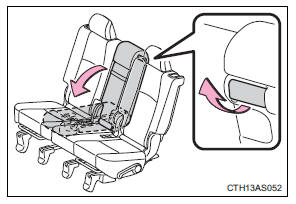
Pull the center seatback angle lever behind the seatback and fold the seatback down.
To return the second row center seatback to its original position, lift it up until it locks.
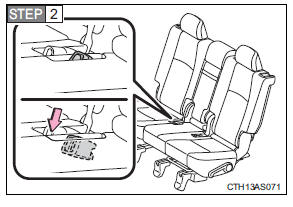
Moving a second row seat for access to the third row seats (vehicles with third row seats)
Getting in the vehicle (right side only)
Pull up the lever and fold down the seatback. The seat will slide forward.
Move the seat to the front-most position.
Getting out of the vehicle (right side only)
Lift the lever on the back of the seatback and fold down the seatback.
The seat will slide forward.
Move the seat to the front-most position.
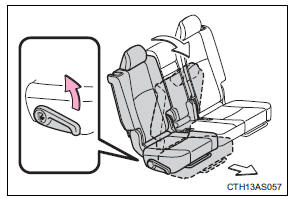
After passengers have entered/exited the vehicle
Lift up the seatback and slide the seat backward until it locks.
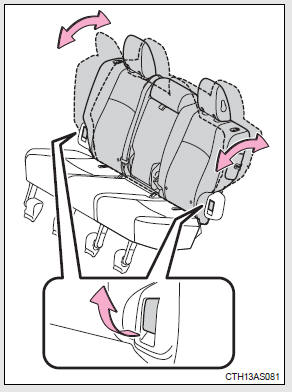
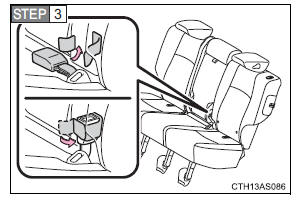
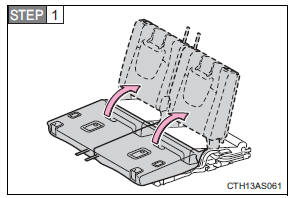
Folding down the third row seats (vehicles with third row seats)
Before folding down the third row seats
Pass the seat belts through the seat belt hangers and secure the seat belt plates.
This prevents the shoulder belts from being damaged.
Make sure that the seat belts are removed from the hangers before using them.
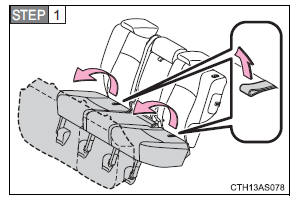
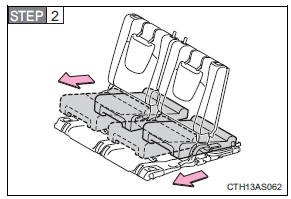
Folding down the third row seats
From inside
Pull the strap to fold down the head restraint.
Pull the lever up.
The seat cushion will slide backward.
Pull the lever to unlock the seatback and then fold the seatback down.
From outside
Pull the strap to fold down the head restraint.
Pull the lever up.
The seat cushion will slide backward and the seatback will be unlocked.
Fold the seatback down.
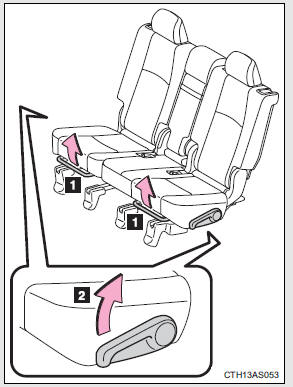
Returning the third row seats
As the seat cushions cannot be pulled forward from outside, this operation can only be performed from inside.
Raise the seatbacks to their original positions.
Make sure they are locked securely.
Pull the seat cushions forward.
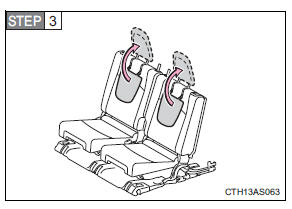
Raise the head restraints.
CAUTION
When folding the rear seatbacks down
Observe the following precautions. Failure to do so may result in death or serious injury.
• Do not fold the seatbacks down while driving.
• Stop the vehicle on level ground, set the parking brake and shift the shift lever to P.
• Do not allow anyone to sit on a folded seatback or in the luggage compartment while driving.
• Do not allow children to enter the luggage compartment.
Seat adjustment
To reduce the risk of sliding under the lap belt during a collision, do not recline the seat more than necessary.
If the seat is too reclined, the lap belt may slide past the hips and apply restraint forces directly to the abdomen, or your neck may contact the shoulder belt, increasing the risk of death or serious injury in the event of an accident.
Adjustments should not be made while driving as the seat may unexpectedly move and cause the driver to lose control of the vehicle.
After returning the rear seatback to the upright position
Observe the following precautions. Failure to do so may result in death or serious injury.
• Make sure the seatback is securely locked by pushing it forward and rearward on the top.
• Check that the seat belts are not twisted or caught in the seatback.
NOTICE
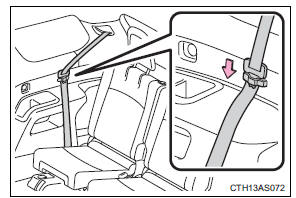
Stowing the seat belts
The seat belts and the buckles must be stowed before you fold down the rear seatbacks.
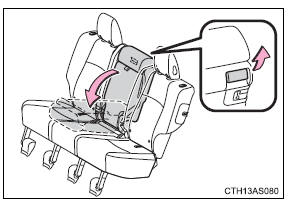
Head restraints
Head restraints are provided for all seats.
Adjusting the head restraints
Front and second seats

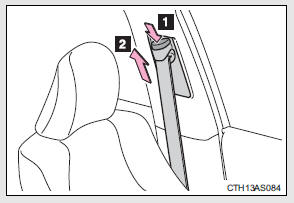
1. Up Pull the head restraints up.
2. Down Push the head restraint down while pushing the lock release button.
Folding the head restraints
Second seats (vehicles without third row seats)

1. To use
2. To fold
Third seats (vehicles with third row seats)

1. To use
2. To fold
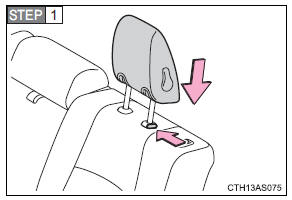
Removing the head restraints (except third row seats)
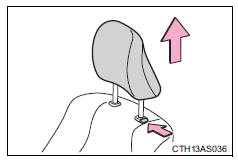
Pull the head restraint up while pressing the lock release button.
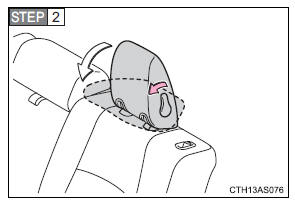
Installing the head restraints (except third row seats)
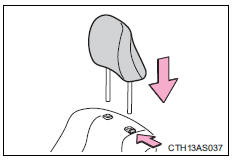
Align the head restraint with the installation holes and push it down to the lock position.
Press and hold the lock release button when lowering the head restraint.
Adjusting the height of the head restraints
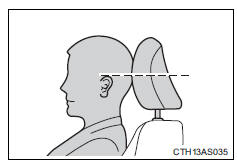
Make sure that the head restraints are adjusted so that the center of the head restraint is closest to the top of your ears.
Adjusting the second center seat head restraint
Always raise the head restraint one level from the stowed position when using.
CAUTION
Head restraint precautions
Observe the following precautions regarding the head restraints. Failure to do so may result in death or serious injury.
• Use the head restraints designed for each respective seat.
• Adjust the head restraints to the correct position at all times.
• After adjusting the head restraints, push down on them and make sure they are locked in position.
• Do not drive with the head restraints removed.
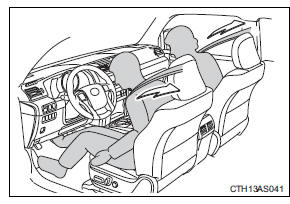
Seat belts
Make sure that all occupants are wearing their seat belts before driving the vehicle.
Correct use of the seat belts
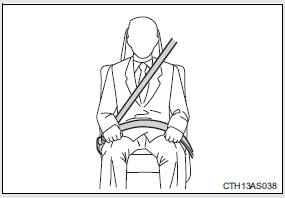
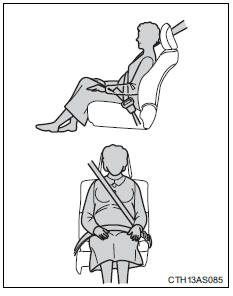
• Extend the shoulder belt so that it comes fully over the shoulder, but does not come into contact with the neck or slide off the shoulder.
• Position the lap belt as low as possible over the hips.
• Adjust the position of the seatback. Sit up straight and well back in the seat.
• Do not twist the seat belt.
Fastening and releasing the seat belt
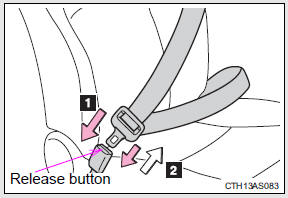
1. To fasten the seat belt, push the plate into the buckle until a click sound is heard.
2. To release the seat belt, press the release button.
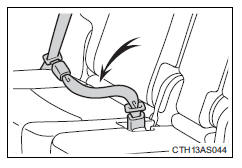
Adjusting the seat belt shoulder anchor height (front seats)
1. Push the seat belt shoulder anchor down while pressing the release button.
2. Push the seat belt shoulder anchor up.
Move the height adjuster up and down as needed until you hear a click.
Seat belt pretensioners (front seats)
The pretensioner helps the seat belt to quickly restrain the occupant by retracting the seat belt when the vehicle is subjected to certain types of severe frontal and side collision or a vehicle rollover.
The pretensioner may not activate in the event of a minor frontal or a minor side impact or a rear impact.
Emergency locking retractor (ELR)
The retractor will lock the belt during a sudden stop or on impact. It may also lock if you lean forward too quickly. A slow, easy motion will allow the belt to extend so that you can move around fully.
Automatic locking retractor (ALR)
When a passenger's shoulder belt is completely extended and then retracted even slightly, the belt is locked in that position and cannot be extended. This feature is used to hold the child restraint system (CRS) firmly.
To free the belt again, fully retract the belt and then pull the belt out once more.
Pregnant women
Obtain medical advice and wear the seat belt in the proper way. Women who are pregnant should position the lap belt as low as possible over the hips in the same manner as other occupants.
Extend the shoulder belt completely over the shoulder and position the belt across the chest. Avoid belt contact over the rounding of the abdominal area.
If the seat belt is not worn properly, not only the pregnant woman, but also the fetus could suffer death or serious injury as a result of sudden braking or a collision.
People suffering illness
Obtain medical advice and wear the seat belt in the proper way.
Child seat belt usage
The seat belts of your vehicle were principally designed for persons of adult size.
• Use a child restraint system appropriate for the child, until the child becomes large enough to properly wear the vehicle’s seat belt.
• When the child becomes large enough to properly wear the vehicle’s seat belt, follow the instructions on P. 86 regarding seat belt usage.
Replacing the belt after the pretensioner has been activated
If the vehicle is involved in multiple collisions, the pretensioner will activate for the first collision, but will not activate for the second or subsequent collisions.
Seat belt extender
If your seat belts cannot be fastened securely because they are not long enough, a personalized seat belt extender is available from your Toyota dealer free of charge.
CAUTION
Observe the following precautions to reduce the risk of injury in the event of sudden braking, sudden swerving or an accident.
Failure to do so may cause death or serious injury.
Wearing a seat belt
• Ensure that all passengers wear a seat belt.
• Always wear a seat belt properly.
• Each seat belt should be used by one person only. Do not use a seat belt for more than one person at once, including children.
• Toyota recommends that children be seated in the rear seat and always use a seat belt and/or an appropriate child restraint system.
• To achieve a proper seating position, do not recline the seat more than necessary. The seat belt is most effective when the occupants are sitting up straight and well back in the seats.
• Do not wear the shoulder belt under your arm.
• Always wear your seat belt low and snug across your hips.
When children are in the vehicle
Do not allow children to play with the seat belt. If the seat belt becomes twisted around a child’s neck, it may lead to choking or other serious injuries that could result in death.
If this occurs and the buckle cannot be unfastened, scissors should be used to cut the belt.
Seat belt pretensioners
• Do not place anything, such as a cushion, on the front passenger's seat.
Doing so will disperse the passenger's weight, which prevents the sensor from detecting the passenger's weight properly. As a result, the seat belt pretensioner for the front passenger's seat may not activate in the event of a collision.
• If the pretensioner has activated, the SRS warning light will come on. In that case, the seat belt cannot be used again and must be replaced at your Toyota dealer.
CAUTION
Adjustable shoulder anchor
Always make sure the shoulder belt is positioned across the center of your shoulder. The belt should be kept away from your neck, but not falling off your shoulder. Failure to do so could reduce the amount of protection in an accident and cause death or serious injuries in the event of a sudden stop, sudden swerve or accident.
Seat belt damage and wear
• Do not damage the seat belts by allowing the belt, plate, or buckle to be jammed in the door.
• Inspect the seat belt system periodically. Check for cuts, fraying, and loose parts. Do not use a damaged seat belt until it is replaced. Damaged seat belts cannot protect an occupant from death or serious injury.
• Ensure that the belt and plate are locked and the belt is not twisted.
If the seat belt does not function correctly, immediately contact your Toyota dealer.
• Replace the seat assembly, including the belts, if your vehicle has been involved in a serious accident, even if there’s no obvious damage.
• Do not attempt to install, remove, modify, disassemble or dispose of the seat belts. Have any necessary repairs carried out by your Toyota dealer.
Inappropriate handling of the pretensioner may prevent it from operating properly, resulting in death or serious injury.v
Using a seat belt extender
• Do not wear the seat belt extender if you can fasten the seat belt without the extender.
• Do not use the seat belt extender when installing a child restraint system because the belt will not securely hold the child restraint system, increasing the risk of death or serious injury in the event of an accident.
• The personalized extender may not be safe on another vehicle, when used by another person, or at a different seating position other than the one originally intended.
NOTICE
When using a seat belt extender
When releasing the seat belt, press on the buckle release button on the extender, not on the seat belt.
This helps prevent damage to the vehicle interior and the extender itself.
Steering wheel
The steering wheel can be adjusted to a comfortable position.
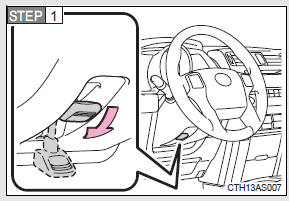
Hold the steering wheel and push the lever down.
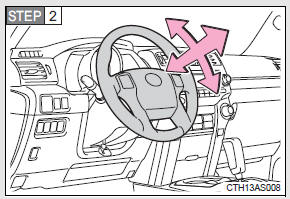
Adjust to the ideal position by moving the steering wheel horizontally and vertically.
After adjustment, pull the lever up to secure the steering wheel.
CAUTION
Caution while driving
Do not adjust the steering wheel while driving.
Doing so may cause the driver to mishandle the vehicle and cause an accident, resulting in death or serious injury.
After adjusting the steering wheel
Make sure that the steering wheel is securely locked.
Otherwise, the steering wheel may move suddenly, possibly causing an accident, and resulting in death or serious injury.
Inside rear view mirror
Glare from the headlights of vehicles behind can be reduced by using the following functions:
Manual anti-glare inside rear view mirror
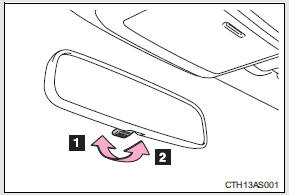
1. Normal position
2. Anti-glare position
Auto anti-glare inside rear view mirror
In automatic mode, sensors are used to detect the headlights of vehicles behind and the reflected light is automatically reduced.
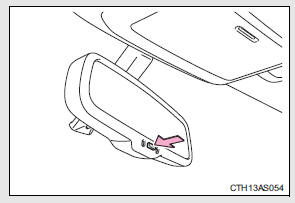
Turns automatic mode on/off
The indicator comes on when automatic mode is turned on.
Vehicles without a smart key system
The mirror will revert to the automatic mode each time the engine switch is turned to the “ON” position.
Vehicles with a smart key system
The mirror will revert to the automatic mode each time the “ENGINE START STOP” switch is turned to IGNITION ON mode.
Adjusting the height of rear view mirror
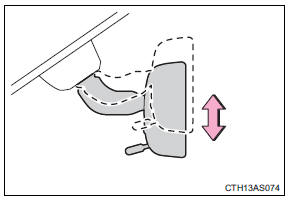
Adjust the height of the rear view mirror by moving it up and down.
To prevent sensor error (vehicles with auto anti-glare inside rear view mirror)
To ensure that the sensors operate properly, do not touch or cover them.
CAUTION
Caution while driving
Do not adjust the position of the mirror while driving.
Doing so may lead to mishandling of the vehicle and cause an accident, resulting in death or serious injury.
Outside rear view mirrors
Mirror angle can be adjusted using the switch.
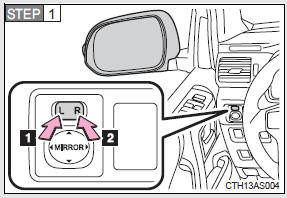
To select a mirror to adjust, press the switch.
1. Left
2. Right
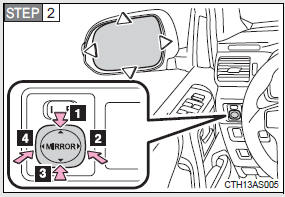
To adjust the mirror, press the switch.
1. Up
2. Right
3. Down
4. Left
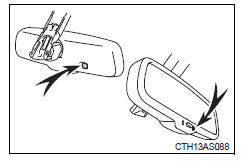
Folding the mirrors
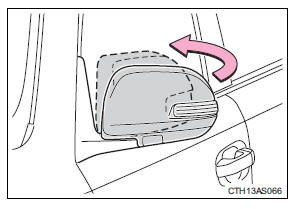
Push the mirror back in the direction of the vehicle's rear.
Mirror angle can be adjusted when
Vehicles without a smart key system
The engine switch is in the “ACC” or “ON” position.
Vehicles with a smart key system
The “ENGINE START STOP” switch is in ACCESSORY or IGNITION ON mode.
When the mirrors are fogged up
Turn on the mirror defoggers to defog the mirrors.
CAUTION
When driving the vehicle
Observe the following precautions while driving.
Failure to do so may result in loss of control of the vehicle and cause an accident, resulting in death or serious injury.
• Do not adjust the mirrors while driving.
• Do not drive with the mirrors folded.
• Both the driver and passenger side mirrors must be extended and properly adjusted before driving.
When a mirror is moving
To avoid personal injury and mirror malfunction, be careful not to get your hand caught by the moving mirror.
When the mirror defoggers are operating
Do not touch the rear view mirror surfaces, as they can become very hot and burn you.
Download Manual